We are all living a life in the technological world, where we have the capability to record something that is happening around us and save it to take a look at any time we want. To do that we have the camera, phones and all those smart devices.

When technology rises to its peak with all the new inventions, won’t we have ways to screen record clips in our PC? There are quite a few ways that you can do it and there are many software that would allow you to screen record but I can’t assure you about the quality and the security, as we know there are many fake and fraudulent apps and software available today. That is why, I have made a good research on this topic and came up with the best ways on how to do screen recording in your windows PC’s.
If you are someone who is working in an office who needs to recheck on so many videos clips might need this option in your PC, not only them but the methods I am going to show below would help teachers and lecturers who download video clips for the purpose of teaching, now you will not need to waste your WiFi data. So come let’s move on to see the methods on how to get your computer screen recorded using a few steps.
There you have to select the option ‘Gaming’.

Now under the game bar you have to toggle on the ‘Record Game Clips, Screenshot And Broadcast Using The Game Bar Options’.

Then type in ‘’Win+G” default keyboard shortcut to open the game bar. It might ask you if the highlighted application is a game, simply press yes.
Next the game bar will appear in the screen’s top edge. It will provide you to access many overlays such as sound, performance and capture.
The capture overlay of the gamebar will appear by default, if its not available you can click on the webcam icon present on the game bar and select start recording on the capture overlay. You can press it again to stop the recording process. Or else you can also press ‘Win+ Alt+R’ to start and stop the record.

All the video recorded will be saved in as an MP4 file. So this is one of the method which available in windows computer to record the screen. Now let's see another method to record the windows screen.
Record Your Screen Using PowerPoint
Firstly, you have to open the PowerPoint in your PC and then click on the insert tab and then select the screen recording button which is located on the media panel.
Then you will see a toolbar pop up in the top center edge of your screen, there you will notice a red boundary cutting through the overlay which will represent your recording space. In case you want to record the whole screen, then together press on the ‘Windows + Shift + F’ keys.
Now you have to click on the record button or you can also press the “Windows + Shift + R’ keys simultaneously.
You can ‘Pause’ and ‘Stop’ the recording using the provided keys.
To save the recording to your PC you have to right click on the video displayed on your PowerPoint and select ‘Save Media As’ option and then follow the on screen prompts that follows after a popup menu.
This way you can record the screen using PowerPoint in your windows computer. Next let's see some offline apps for computer screen recording.

Snagit App: This is an app that can be used paid. It has so many options that it targets the startups more than the gamers. They got tons of recording features that can be used for show casting products and creating marketing videos, how-to features, vlogs and so much more. The added features in the app is worth it and can be used professionally.
That’s it, now we have checked on a few methods on how to screen record manually using the game bar, PowerPoint and also two other alternative apps that can installed if needed. You can go through the posts and find what is the best for you and select the right method. Hope this article would have been useful for you in funding out not one method but a few more on how to screen record in your windows PC.
Not only that but when we see some images or video clips using our phones, we have the ability to save the file by downloading that particular image or video clip. Later on, people found out ways to not waste their internet data by downloading the files, rather they were able to screenshot them and screen record video clips using the smart phones. But are we able to do so in our computer? Well, definitely yes and it’s a simple task to follow.
When technology rises to its peak with all the new inventions, won’t we have ways to screen record clips in our PC? There are quite a few ways that you can do it and there are many software that would allow you to screen record but I can’t assure you about the quality and the security, as we know there are many fake and fraudulent apps and software available today. That is why, I have made a good research on this topic and came up with the best ways on how to do screen recording in your windows PC’s.
If you are someone who is working in an office who needs to recheck on so many videos clips might need this option in your PC, not only them but the methods I am going to show below would help teachers and lecturers who download video clips for the purpose of teaching, now you will not need to waste your WiFi data. So come let’s move on to see the methods on how to get your computer screen recorded using a few steps.
Record Your Computer Screen Using Game Bar
To use this method, your PC should support at least one of the following encoders provided.
To use this method, your PC should support at least one of the following encoders provided.
- AMD VCE – ( AMD Radeon HD 7900 or newer)
- Intel Quick Sync H.260 (Intel 2nd generation CPU or newer.
- Nvidia NVENC (Most Nvidia Geforce 600, Quadro K series or newer)
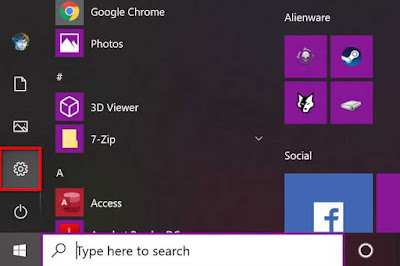
Firstly, you have to press the start button and then the gear icon in the start menu which will open up the settings tab.
There you have to select the option ‘Gaming’.
Now under the game bar you have to toggle on the ‘Record Game Clips, Screenshot And Broadcast Using The Game Bar Options’.
Then type in ‘’Win+G” default keyboard shortcut to open the game bar. It might ask you if the highlighted application is a game, simply press yes.
Next the game bar will appear in the screen’s top edge. It will provide you to access many overlays such as sound, performance and capture.
The capture overlay of the gamebar will appear by default, if its not available you can click on the webcam icon present on the game bar and select start recording on the capture overlay. You can press it again to stop the recording process. Or else you can also press ‘Win+ Alt+R’ to start and stop the record.
All the video recorded will be saved in as an MP4 file. So this is one of the method which available in windows computer to record the screen. Now let's see another method to record the windows screen.
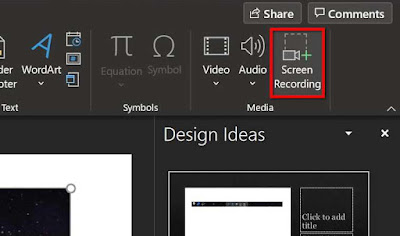
Record Your Screen Using PowerPoint
Firstly, you have to open the PowerPoint in your PC and then click on the insert tab and then select the screen recording button which is located on the media panel.
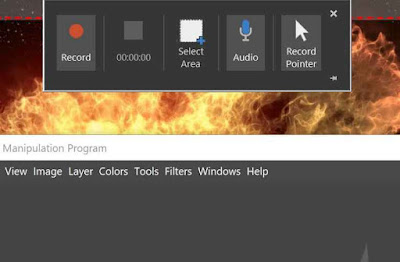
Then you will see a toolbar pop up in the top center edge of your screen, there you will notice a red boundary cutting through the overlay which will represent your recording space. In case you want to record the whole screen, then together press on the ‘Windows + Shift + F’ keys.
Now you have to click on the record button or you can also press the “Windows + Shift + R’ keys simultaneously.
You can ‘Pause’ and ‘Stop’ the recording using the provided keys.
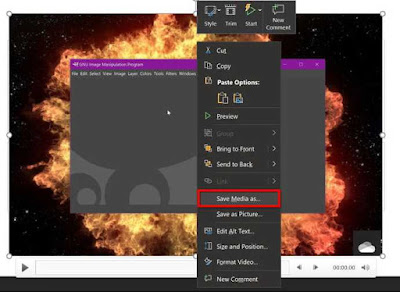
To save the recording to your PC you have to right click on the video displayed on your PowerPoint and select ‘Save Media As’ option and then follow the on screen prompts that follows after a popup menu.
This way you can record the screen using PowerPoint in your windows computer. Next let's see some offline apps for computer screen recording.
OBS Studio App: This is one of the frequently used offline application for the purpose of screen recording. It provides you unlimited screen recording opportunity with free of charge. You can record full screen without watermarks. This app is used for professional purposes and thereby it works without any errors. It also has a built in streaming function for those who wish to go live while recording. It has a great hardware support which enables 60 frames per second.
Snagit App: This is an app that can be used paid. It has so many options that it targets the startups more than the gamers. They got tons of recording features that can be used for show casting products and creating marketing videos, how-to features, vlogs and so much more. The added features in the app is worth it and can be used professionally.
That’s it, now we have checked on a few methods on how to screen record manually using the game bar, PowerPoint and also two other alternative apps that can installed if needed. You can go through the posts and find what is the best for you and select the right method. Hope this article would have been useful for you in funding out not one method but a few more on how to screen record in your windows PC.